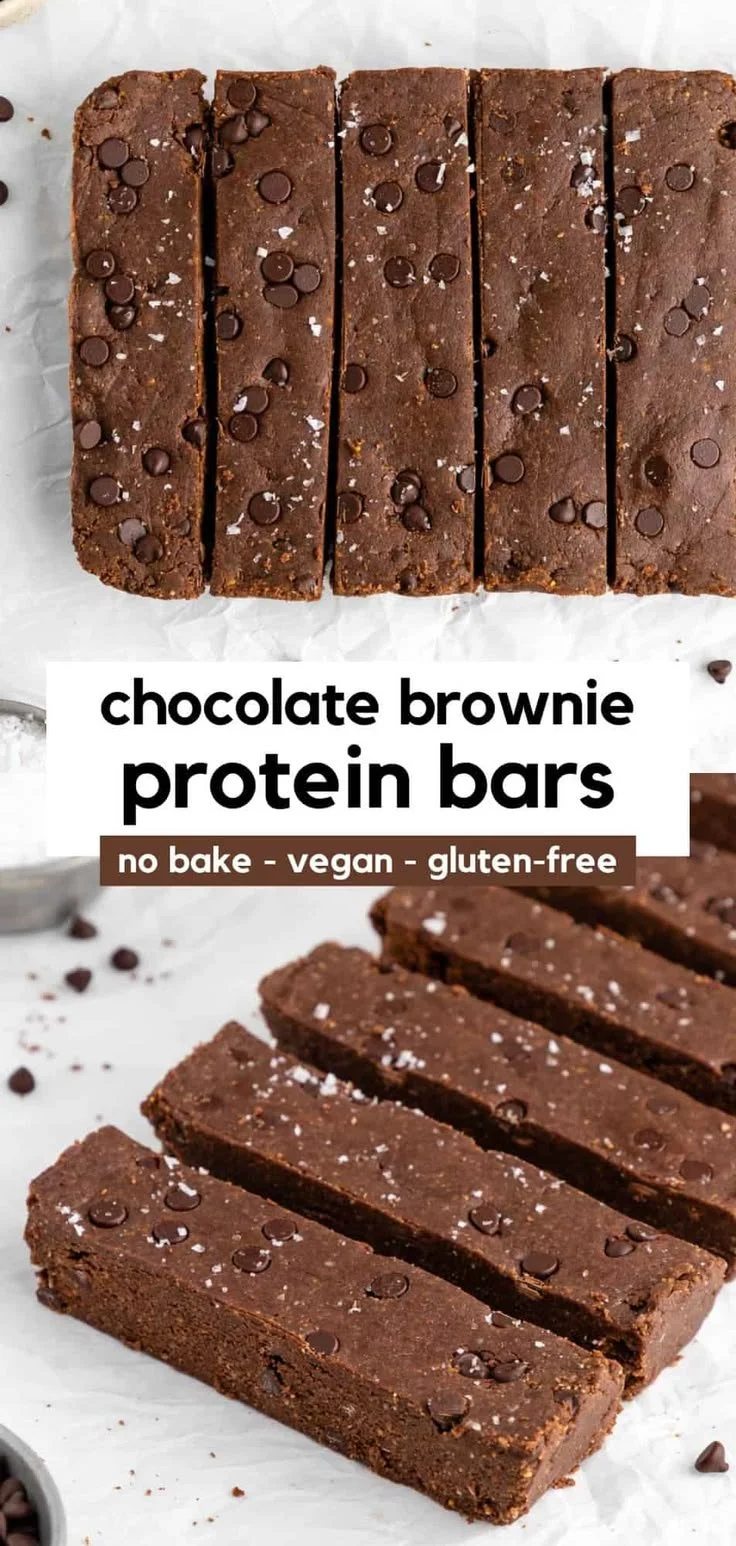
Brownie Protein Bars are the perfect fuel for your busy day. Combining rich chocolate flavor with wholesome ingredients, these bars are not just healthy—they’re genuinely satisfying. With simple, approachable steps, you can whip up a batch that works great for snacks or post-workout treats.
Why You’ll Love Brownie Protein Bars
- Simple Ingredients: Made with just a few pantry staples, these bars are easy to whip up without complicated cooking processes.
- Nutritious Snack: Packed with protein and healthy fats, they make a great option for anyone seeking guilt-free indulgence.
- Quick to Prepare: With minimal prep time, you can have these bars ready in under an hour.
- Meal Prep Favorite: They store well in the fridge or freezer, making them ideal for meal prep or on-the-go snacks.
- Family-Friendly Treat: Whether for yourself or your kids, everyone will enjoy these delectable chocolate treats with no fuss.
Recipe Overview
- Prep Time: 10 minutes
- Cook Time: 0 minutes (setting time included)
- Total Time: 40 minutes (30 minutes to chill)
- Servings: 12 bars
- Difficulty Level: Easy
Ingredients You’ll Need for Brownie Protein Bars
- 1 cup chocolate protein powder: Adds a rich chocolate flavor while boosting protein content.
- 1 cup almond flour: Provides a nutty taste and ensures the bars are gluten-free. If needed, substitute with oat flour for a similar texture.
- 1/2 cup almond butter: Acts as a binder while adding healthy fats. You can use any nut or seed butter as a substitute based on preference.
- 1/4 cup maple syrup: Sweetens the bars naturally. Honey can replace this if you prefer.

here
How to Make Brownie Protein Bars
-
Mix Dry Ingredients: In a large mixing bowl, combine the chocolate protein powder and almond flour. Stir until well incorporated.
-
Add Wet Ingredients: Add the almond butter and maple syrup to the bowl.
-
Combine: Mix all the ingredients thoroughly until a dough forms. You want the mixture to be well blended but still slightly sticky.
-
Press into Dish: Line a baking dish with parchment paper. Transfer the mixture and press it down evenly into the dish, smoothing out the top.
-
Chill to Set: Place the baking dish in the refrigerator for at least 30 minutes to allow the bars to set properly.
-
Cut and Serve: Once set, slice into bars and enjoy them as a nutritious snack or post-workout treat.
Tips for Success
- Use Parchment Paper: Lining your baking dish with parchment paper makes it easier to lift out the bars after chilling.
- Check Consistency: If the mixture feels too dry, add a splash of water or more almond butter. It should hold together without being overly sticky.
- Don’t Rush Chilling: Allowing the bars to chill ensures they set firm enough to hold their shape when cutting.
- Store Safely: Keep your bars in an airtight container to maintain freshness.
- Taste Test: Feel free to adjust sweetness with more maple syrup if desired.
Easy Variations
- Nut-Free Version: Swap almond butter for sunflower seed butter to keep it nut-free.
- Chocolate Chunk Version: Stir in dark chocolate chips for extra sweetness and a delightful texture.
- Protein Boost: Add in a scoop of chia seeds or flaxseeds for additional nutrition.
- Flavor Twist: Incorporate a teaspoon of vanilla extract or almond extract to change up the flavor profile.
- Cocoa Powder Addition: For an extra chocolate kick, mix in 2 tablespoons of unsweetened cocoa powder.
What to Serve with Brownie Protein Bars
- Fruit Smoothie: Pair these bars with a banana or berry smoothie for a balanced snack.
- Greek Yogurt: Serve alongside Greek yogurt for a creamy, protein-packed addition.
- Nut Trail Mix: A small handful of nuts or a trail mix complements the bars perfectly for a crunchy contrast.
- Dark Chocolate: Enjoy with a piece of dark chocolate for an indulgent treat.
- Fresh Berries: Berries provide a refreshing touch that balances the sweetness of the bars.
Storage and Reheating
- Refrigerator Storage: Store the bars in an airtight container in the fridge for up to a week.
- Freezer Storage: For longer storage, freeze individually wrapped bars for up to three months. Thaw in the fridge overnight before enjoying.
- Reheating: If you prefer them warm, briefly microwave for 10-15 seconds. This will soften them while retaining texture.
- Meal Prep Note: Make a double batch and freeze them for grab-and-go snacks throughout the week.
Common Mistakes to Avoid
- Overmixing: Be careful not to overmix the dough, which can lead to tough bars. Mix just until combined.
- Skipping Chilling: Don’t skip the chilling step as it’s essential for the bars to hold their shape when cut.
- Incorrect Consistency: Make sure the dough is properly set before cutting. If too crumbly, it may not hold together well.
- Using Too Little Sweetener: Adjust sweetness to your liking; too little can result in a bland bar.
- Incorrect Oven Temperature: When baking, always ensure the oven is pre-heated to avoid uneven cooking.
Brownie Protein Bars: Background & Cultural Inspiration
Brownie Protein Bars take inspiration from traditional brownies but are adapted to meet the needs of health-conscious eaters. Originating as a staple treat in American kitchens, brownies offer a rich chocolate experience. These protein-packed bars turn that indulgence into a more nourishing snack while preserving the familiarity and appeal of the original dessert. They embody the growing trend of incorporating healthier alternatives into beloved recipes, making them suitable for anyone looking to enjoy tasty but wholesome foods.
Frequently Asked Questions
Can I use a different sweetener?
Yes, you can substitute maple syrup with honey or agave nectar, adjusting the quantity based on your taste preference.
How long do the bars last?
When stored in an airtight container in the refrigerator, these bars will last about a week. They can be frozen for up to three months.
Can I make these bars vegan?
Yes! To make them vegan, use a plant-based protein powder and ensure your almond butter and maple syrup are certified vegan.
What if I don’t have protein powder?
You can replace protein powder with additional almond flour, but keep in mind that the bars will have less protein.
Can I add dried fruit?
Absolutely! Chopped dried fruits such as dates, raisins, or cranberries can be mixed in to enhance flavor and texture.
Final Thoughts
These Brownie Protein Bars are an effortless and nutritious treat that balances indulgence with health. They are perfect as a snack, dessert, or a post-workout pick-me-up. With a straightforward recipe that you can master in no time, you’ll find endless reasons to enjoy these bars regularly. So go ahead, give this recipe a try—you won’t be disappointed!
PrintBrownie Protein Bars
These Brownie Protein Bars combine rich chocolate flavor with wholesome ingredients, making them a nutritious and satisfying snack.
- Prep Time: 10 minutes
- Cook Time: 30 minutes
- Total Time: 40 minutes
- Yield: 12 bars
- Category: Snack
- Method: Chilling
- Cuisine: American
- Diet: Gluten-Free, Protein-rich
Ingredients
- 1 cup chocolate protein powder
- 1 cup almond flour
- 1/2 cup almond butter
- 1/4 cup maple syrup
Instructions
- Mix dry ingredients: In a large mixing bowl, combine the chocolate protein powder and almond flour. Stir until well incorporated.
- Add wet ingredients: Add the almond butter and maple syrup to the bowl.
- Combine: Mix all the ingredients thoroughly until a dough forms.
- Press into dish: Line a baking dish with parchment paper. Transfer the mixture and press it down evenly into the dish.
- Chill to set: Place the baking dish in the refrigerator for at least 30 minutes.
- Cut and serve: Once set, slice into bars and enjoy them as a nutritious snack.
Notes
Use parchment paper for easier removal and store in an airtight container for freshness. Adjust sweetness with more maple syrup if desired.