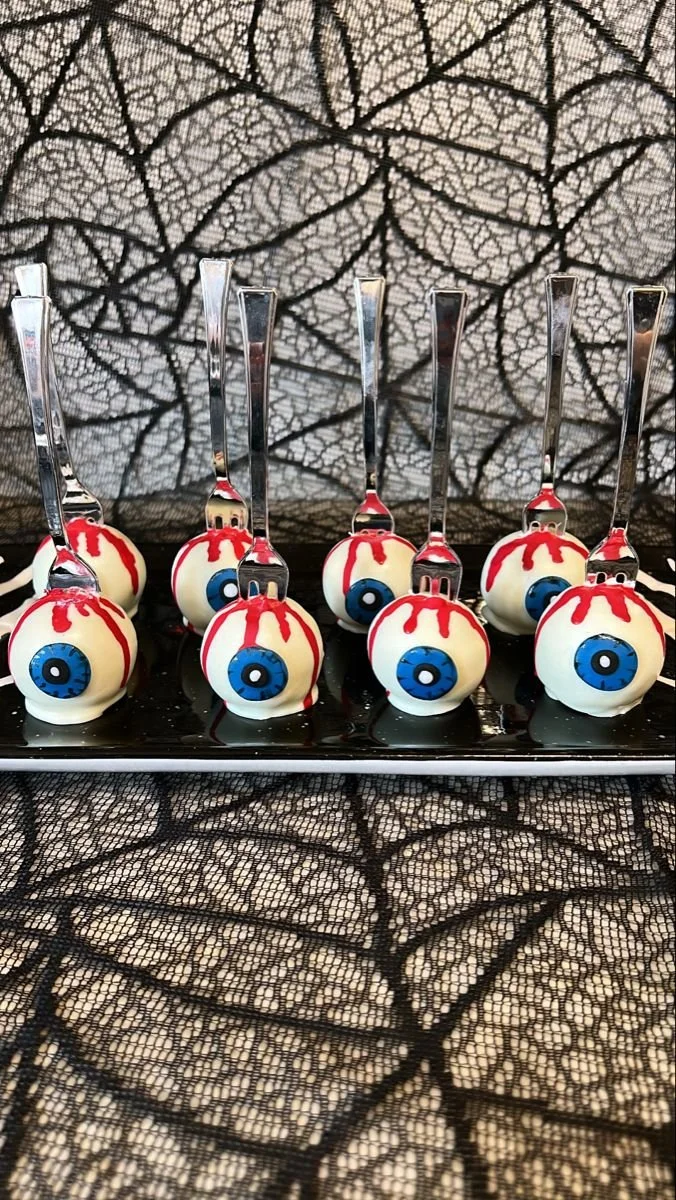
Making Eye Ball Cake Pops is a fun and festive project that’s sure to delight both kids and adults. These spooky treats are perfect for Halloween parties, school functions, or any occasion where you want to add a little flair to your dessert table. With colorful decorations and delicious flavors, they’re easy to make and even easier to enjoy.
Why You’ll Love Eye Ball Cake Pops
- Simple Ingredients: This recipe requires just a few basic ingredients that you probably already have in your pantry. It’s budget-friendly and easy to prepare.
- Perfect for Beginners: Even if you’re new to baking or cake decorating, you’ll find these cake pops easy to make. The step-by-step instructions guide you through the process.
- Creative and Fun: You can customize the designs with different candy melts and sprinkles, making each cake pop unique. It’s a great way to get creative, especially with kids!
- Party Ready: These cake pops are a hit at parties, adding a spooky touch to your dessert table. They look cute and taste delightful, making them a crowd favorite.
- Make Ahead: These treats can be made in advance and stored, saving you time on the day of your event. They stay fresh in the fridge or freezer.
Recipe Overview
- Prep Time: 30 minutes
- Cook Time: 25 minutes
- Total Time: 55 minutes (plus chilling time)
- Servings: 12-15 cake pops
- Difficulty Level: Easy
Ingredients You’ll Need for Eye Ball Cake Pops
- 1 box cake mix (any flavor): This forms the base of the cake pops. Feel free to use chocolate, vanilla, or any flavor you prefer.
- 1 cup frosting (any flavor): The frosting is essential for binding the crumbled cake and adding moisture. Use a flavor that complements your cake mix.
- Candy melts (white and colored): White candy melts create a nice coating, and colorful candy melts can be used for decorative details.
- Candy eyes: These add the fun "eyeball" effect for your cake pops.
- Lollipop sticks: These are necessary for assembling the cake pops.
- Sprinkles (optional): Use to add extra color and texture.

How to Make Eye Ball Cake Pops
-
Prepare the Cake: Bake the cake mix according to the package instructions in a round cake pan. Once it’s baked, let the cake cool completely on a wire rack.
-
Crumble the Cake: After the cake has cooled, crumble it into a large bowl using your hands or a fork. The texture should be fine, with no large chunks remaining.
-
Add Frosting: Mix in the frosting until well combined. The mixture should be moist and easy to shape, but not overly wet.
-
Shape the Cake Balls: Roll the mixture into balls about 1 inch in diameter and place them on a baking sheet lined with parchment paper. Freeze the cake balls for about 30 minutes to firm them up.
-
Melt Candy Coating: Melt the white candy melts according to the package instructions in a microwave-safe bowl, stirring until smooth.
-
Insert Lollipop Sticks: Dip the end of each lollipop stick into the melted candy coating, then insert it into the center of each cake ball. This helps the stick stay in place when coating.
-
Coat the Cake Pops: Dip each cake pop into the melted white chocolate until fully covered. Allow any excess to drip off before placing them upright on a stand or in a styrofoam block to set.
-
Add Eyes and Decorate: While the coating is still wet, add a candy eye to each cake pop. Optionally, you can use colored candy melts for additional decorative details or sprinkles for some extra fun.
-
Let Them Set: Allow the cake pops to sit until the chocolate hardens completely, about 15-30 minutes.
Tips for Success
- Cool Completely: Make sure your cake is completely cooled before crumbling it; otherwise, the heat can melt the frosting and make the mixture too soft.
- Chill Before Coating: Freezing the cake balls before dipping helps them hold their shape and makes it easier to coat them with the candy melts.
- Experiment with Coatings: You can use chocolate or flavored candy melts if you want variety in taste and color.
- Don’t Overheat Candy Melts: Heat the candy melts in short bursts to avoid burning. Stir often for a smooth consistency.
- Use Parchment Paper: Line your baking sheet with parchment paper to prevent the cake pops from sticking.
Easy Variations
- Different Flavors: Swap the cake mix and frosting for different flavor combinations, like red velvet with cream cheese frosting or lemon cake with lemon frosting.
- Colored Coatings: Use colored candy melts to match themes or parties—think orange for Halloween or green for a monster theme!
- Add Flavoring: Consider adding a teaspoon of vanilla extract or flavored extracts to the cake mixture for a flavor boost.
- Stuffed Cake Pops: Add a small filling like chocolate chips or fruit preserves inside the cake balls before shaping them.
- Healthy Option: Use a low-sugar cake mix and a yogurt-based frosting for a guilt-free treat.
What to Serve with Eye Ball Cake Pops
- Milk: A classic pairing that complements the sweetness of the cake pops and balances their rich flavors.
- Coffee: The bitter notes of coffee contrast nicely with the sweetness of the cake pops, making it a great adult treat.
- Fruit Platters: Fresh fruits provide a light and refreshing contrast to the sugary cake pops.
- Ice Cream: Serve with a scoop of vanilla or chocolate ice cream for an indulgent dessert experience.
- Halloween-themed Candy: Create a spread with other spooky treats to enhance the theme for Halloween parties.
Storage and Reheating
- Refrigerator Storage: Store the cake pops in an airtight container in the fridge for up to a week.
- Freezer Storage: You can freeze the cake pops for up to 3 months. Make sure they’re in a single layer and wrapped well to avoid freezer burn.
- Reheating: These cake pops do not need reheating. Simply let them sit at room temperature for a few minutes if they’ve been in the fridge.
- Preserve Texture: Avoid exposing them to moisture; this can affect the candy coating.
Common Mistakes to Avoid
- Using Warm Cake: Always let the cake cool completely before crumbling; warm cake can lead to a soggy mixture.
- Not Freezing Enough: If you skip the freezing step, the cake pops may lose their shape when dipped in candy melts.
- Overheating Candy Coating: This can cause your candy melts to seize up. Heat in short intervals instead.
- Skipping Decorations: For best results, decorate while the coating is still wet to ensure the eyes and sprinkles stick well.
- Not Mixing Enough: Ensure the frosting is fully incorporated, so the cake pops hold together properly.
Eye Ball Cake Pops: Background & Cultural Inspiration
Cake pops are a popular treat that originated in the United States in the early 2000s. They gained popularity due to their bite-sized form and delightful combinations of cake and frosting. The idea of decorating them to resemble spooky eyeballs is a playful take on traditional Halloween treats. This adds a fun twist, making them perfect for festive gatherings. They capture the spirit of creativity and community in the kitchen, inviting bakers of all ages to come together.
Frequently Asked Questions
Can I use store-bought frosting?
Yes, store-bought frosting works perfectly for this recipe. Feel free to choose your favorite flavor!
How long do cake pops last?
Stored in an airtight container, cake pops can last up to a week in the fridge or up to three months in the freezer.
Can I make these cake pops in advance?
Absolutely! You can make cake pops a few days in advance and store them in the fridge until you are ready to serve.
Can I use different types of cake mix?
Yes, you can use any flavor of cake mix for this recipe. Chocolate, funfetti, or red velvet are all great options!
What should I do if my candy melts are too thick?
If your candy melts are too thick after melting, you can add a small amount of vegetable shortening or coconut oil to thin it out for easier dipping.
Final Thoughts
Eye Ball Cake Pops are a delightful way to bring some fun and creativity into your baking routine. They offer a simple yet exciting project that’s great for parties and gatherings. The joy of making them with family or friends only adds to their appeal. Give this recipe a try, and you’ll see just how enjoyable and delicious they can be!
PrintEye Ball Cake Pops

Fun and festive Eye Ball Cake Pops perfect for Halloween parties and gatherings. Easy to make with colorful decorations.
- Prep Time: 30 minutes
- Cook Time: 25 minutes
- Total Time: 55 minutes
- Yield: 12-15 cake pops
- Category: Dessert
- Method: Baking
- Cuisine: American
- Diet: Vegetarian
Ingredients
- 1 box cake mix (any flavor)
- 1 cup frosting (any flavor)
- Candy melts (white and colored)
- Candy eyes
- Lollipop sticks
- Sprinkles (optional)
Instructions
- Prepare the Cake: Bake the cake mix according to the package instructions in a round cake pan. Once it’s baked, let the cake cool completely on a wire rack.
- Crumble the Cake: After the cake has cooled, crumble it into a large bowl using your hands or a fork. The texture should be fine, with no large chunks remaining.
- Add Frosting: Mix in the frosting until well combined. The mixture should be moist and easy to shape, but not overly wet.
- Shape the Cake Balls: Roll the mixture into balls about 1 inch in diameter and place them on a baking sheet lined with parchment paper. Freeze the cake balls for about 30 minutes to firm them up.
- Melt Candy Coating: Melt the white candy melts according to the package instructions in a microwave-safe bowl, stirring until smooth.
- Insert Lollipop Sticks: Dip the end of each lollipop stick into the melted candy coating, then insert it into the center of each cake ball. This helps the stick stay in place when coating.
- Coat the Cake Pops: Dip each cake pop into the melted white chocolate until fully covered. Allow any excess to drip off before placing them upright on a stand or in a styrofoam block to set.
- Add Eyes and Decorate: While the coating is still wet, add a candy eye to each cake pop. Optionally, you can use colored candy melts for additional decorative details or sprinkles for some extra fun.
- Let Them Set: Allow the cake pops to sit until the chocolate hardens completely, about 15-30 minutes.
Notes
Make sure your cake is cooled completely to prevent a soggy mixture. Experiment with different flavors and coatings.