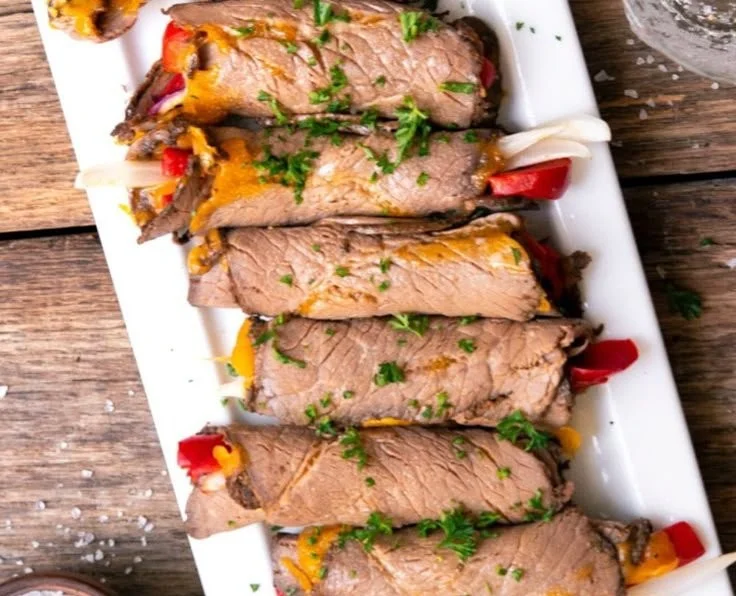
Roast Beef Roll Ups are a quick and satisfying dish that perfectly balances savory flavors and delightful textures. These low-carb treats are easy to prepare and make a great snack or meal option. With just a few simple ingredients, you can create a delicious dish that will impress your family and friends.
Why You’ll Love Roast Beef Roll Ups
- Quick to Make: With minimal prep and cook time, these roll ups can be ready in about 20 minutes, making them perfect for busy weeknights.
- Low-Carb Delight: Ideal for anyone following a low-carb or keto diet, these roll ups are satisfying without the extra carbs found in traditional wraps.
- Customizable Flavors: You can easily adjust the ingredients to match your taste, making them versatile for various palates and preferences.
- Perfect for Meal Prep: These roll ups store well in the fridge, making them an excellent choice for meal prepping. You can whip up a batch and enjoy them throughout the week.
- Family Friendly: Kids love the bite-sized nature of these roll ups, and you can sneak in extra veggies to boost the nutritional value without complaints.
Recipe Overview
- Prep Time: 10 minutes
- Cook Time: 10 minutes
- Total Time: 20 minutes
- Servings: 4
- Difficulty Level: Easy
Ingredients You’ll Need for Roast Beef Roll Ups
- Roast Beef Slices: Use thinly sliced roast beef, which adds rich flavor and protein.
- Cheddar Cheese: Sharp cheddar works best for a nice, bold flavor, but feel free to substitute with your favorite cheese.
- Onions: Sliced onions add sweetness and moisture. You can use yellow or red onions based on your preference.
- Bell Peppers: Sliced bell peppers bring a crunchy texture and vibrant color. Any color works well.
- Olive Oil: Use this for sautéing the vegetables and adding flavor.
- Salt & Pepper: Season to taste; these spices enhance the flavor profile of your roll ups.

How to Make Roast Beef Roll Ups
- Heat the Oil: In a skillet, heat 1 tablespoon of olive oil over medium heat.
- Sauté Vegetables: Add sliced onions and bell peppers, sautéing until soft and fragrant, about 5-7 minutes.
- Layer Ingredients: Lay out a slice of roast beef, then place a slice of cheddar cheese on top. Add a spoonful of the sautéed onions and peppers.
- Roll It Up: Starting from one end, roll the roast beef tightly around the filling, creating a secure roll.
- Repeat: Continue the same process with the remaining slices of roast beef and filling ingredients.
- Serve or Warm: You can enjoy them immediately or warm them in the same pan until the cheese melts, about 2-3 minutes.
Tips for Success
- Don’t Overcook the Vegetables: Sauté just until they are tender; you still want some crunch for texture.
- Use Quality Ingredients: High-quality roast beef and cheese can make a noticeable difference in the final flavor.
- Control the Heat: Keep the sautéing temperature medium; too high can burn the vegetables before they soften.
- Roll Tightly: Make sure to wrap the roll ups tightly to prevent them from falling apart when serving.
- Experiment with Seasonings: Try adding garlic powder or a pinch of paprika to the sautéed veggies for an extra flavor boost.
Easy Variations
- Turkey or Chicken Rolls: Substitute the roast beef with thinly sliced turkey or chicken for a different protein option.
- Spicy Kick: Add jalapeño slices or a sprinkle of red pepper flakes to the filling for some heat.
- Vegetarian Option: Use hummus or cream cheese spread with sliced cucumbers for a veggie-filled alternative.
- Mixed Cheeses: Blend different types of cheeses, like pepper jack or mozzarella, for unique flavors.
- Wraps with Lettuce: For an even lighter version, use large lettuce leaves to roll up the fillings instead of meat.
What to Serve with Roast Beef Roll Ups
- Side Salad: A simple green salad pairs wonderfully, providing freshness and balance to the richness of the roll ups.
- Vegetable Sticks: Crunchy carrot or celery sticks make for a healthy and refreshing side.
- Dipping Sauce: Ranch or spicy mustard can enhance the flavors and add another layer of enjoyment.
- Stuffed Avocado: A stuffed avocado filled with shrimp or crab salad complements the roll ups beautifully.
- Cauliflower Rice: Use this as a low-carb base to help soak up any extra juices from the roll ups.
Storage and Reheating
- Refrigerator Storage: Keep leftovers in an airtight container in the fridge for up to 3 days.
- Freezer Storage: You can freeze the roll ups for up to a month. Wrap them tightly in plastic wrap and then foil for best results.
- Best Reheating Method: Reheat in a skillet over medium heat to keep the roll ups from getting soggy while melting the cheese.
- Preserve Texture: Avoid the microwave, as it can make the roll ups chewy.
- Meal Prep Tip: Assemble and store before cooking for an easy grab-and-go option during busy days.
Common Mistakes to Avoid
- Using Thick Meat: If the roast beef is too thick, it will be difficult to roll; thin slices are key to success.
- Overcrowding the Skillet: Sauté vegetables in batches if necessary to ensure even cooking and proper browning.
- Failing to Season: Remember to taste and adjust seasoning while cooking for the best flavor.
- Not Sealing the Rolls: Make sure the ends of the roll are secured to prevent spills during cooking or serving.
- Skipping the Heating Step: Serving them cold may miss out on the delicious melted cheese experience.
Roast Beef Roll Ups: Background & Cultural Inspiration
Roast beef is a classic ingredient in many cultures, often celebrated for its rich and savory flavor. The idea of rolling meats around fillings dates back centuries, reflecting various culinary traditions from different parts of the world. Commonly found in deli sandwiches, roast beef has been enjoyed by families around dining tables for generations. This recipe combines the heartiness of roast beef with accessible ingredients, showcasing how simple techniques can create satisfying meals that resonate with comfort food lovers.
Frequently Asked Questions
Can I use different types of cheese?
Absolutely! You can use any cheese that melts well, such as mozzarella or provolone.
Can I prepare these roll ups in advance?
Yes, you can assemble them a day ahead and store them in the refrigerator. Just warm them up before serving.
How spicy are these roll ups?
The spiciness can vary depending on the ingredients you use. If you prefer milder flavors, skip the hot peppers.
Can I make these vegetarian?
Yes, consider substituting the roast beef with other fillings like roasted vegetables, cheese, and a flavored cream cheese spread.
What’s the best way to avoid soggy roll ups?
Make sure to sauté the vegetables just until soft and avoid overfilling each roll to keep them from getting too wet.
Final Thoughts
Roast Beef Roll Ups are not just quick and easy to prepare, but they’re also versatile and family-friendly. Perfect for a snack, light meal, or party dish, these roll ups offer a satisfying blend of flavors without the guilt of traditional wraps. Whether you’re meal prepping for the week or looking for a delightful dish to serve at gatherings, give this recipe a try. You’ll find it becomes a favorite in your home cooking repertoire.
PrintRoast Beef Roll Ups
Quick and satisfying low-carb roll ups that combine savory roast beef with delicious sautéed veggies and cheese.
- Prep Time: 10 minutes
- Cook Time: 10 minutes
- Total Time: 20 minutes
- Yield: 4 servings
- Category: Snacks
- Method: Sautéing
- Cuisine: American
- Diet: Low-Carb
Ingredients
- 8 ounces Roast Beef Slices
- 4 ounces Cheddar Cheese, thinly sliced
- 1 medium Onions, sliced
- 1 cup Bell Peppers, sliced
- 1 tablespoon Olive Oil
- Salt & Pepper, to taste
Instructions
- Heat the olive oil in a skillet over medium heat.
- Add sliced onions and bell peppers, sautéing until soft and fragrant, about 5-7 minutes.
- Lay out a slice of roast beef, then place a slice of cheddar cheese on top. Add a spoonful of the sautéed onions and peppers.
- Roll the roast beef tightly around the filling to create a secure roll.
- Continue the same process with the remaining slices of roast beef and filling ingredients.
- Enjoy them immediately or warm them in the same pan until the cheese melts, about 2-3 minutes.
Notes
Great for meal prep and customizations. Serve with a side salad or dipping sauce for an added touch.